Braum Advan Series Racing Seats (Black Leatherette) ?? Pair
Description
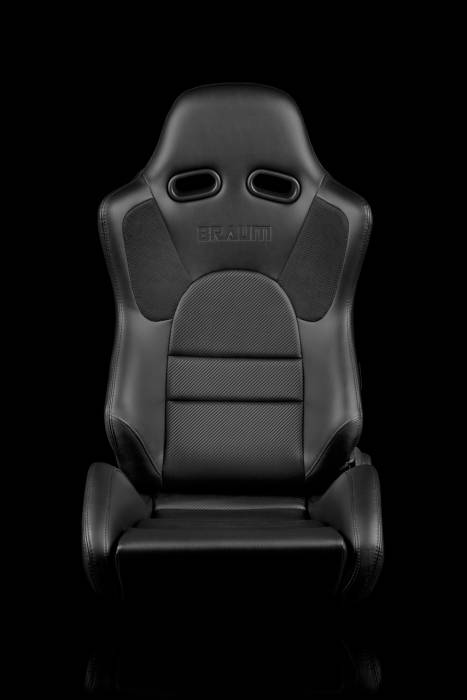
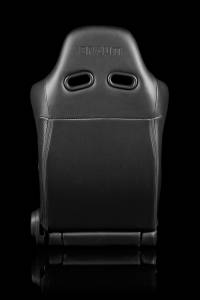
Braum Advan Sereis Racing Seats
The ADVAN series racing seats are designed for those who like to have their cake and eat it too. With the ADVAN series seats you don’t have to choose between practicality and performance. Like the rest of the BRAUM lineup, the ADVAN series seats offer street-friendly features like an easy to adjust, handle-type reclining mechanism, as well as easy to clean and aesthetically pleasing leatherette. All this in a track-friendly package, with features like strategically-placed anti-slip fabric and high thigh bolsters—the most aggressive in our lineup. Like the other seats in BRAUM’s lineup, the ADVAN series seats are also made with high strength steel tubular frames wrapped in our proprietary heat-and-pressure sensitive injection-molded foam for a one-of-a-kind fit and unmatched comfort. The result is a seat with all the benefits of a seat made for the street—the looks, durability, and ease of maintenance of leatherette and the convenience of a reclining mechanism—as well as the benefits of a track-oriented seat, like high-friction jacquard fabric for high-contact areas (back and legs) and aggressive bolstering. The ADVAN series seats are track ready without requiring track exclusivity, still allowing for effortless ingress and egress.
- Strong, lightweight steel tubular frame
- Injection molded foam
- Choose from leatherette or leatherette/jacquard fabric combo
- Handle-type reclining mechanism
- Faux carbon fiber fabric backing
- Bottom mount style (will need vehicle-specific seat brackets)
- Comes with two seats and dual lock sliders for front-back adjustment
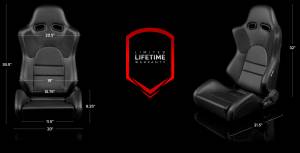
- 23 lbs. (without bracket or sliders)
- Fits up to 38” waist
- Limited Lifetime Warranty
INSTALLATION GUIDE:
Installing aftermarket racing seats in your vehicle can be one of the most rewarding modifications you can do to your vehicle. The process is simple and straightforward, and the results are both pleasing and prominent. A good set of aftermarket seats will hold you snugly in place while providing a soft, compliant ride. They look great too! However, the actual process can be daunting and intimidating. Although the installation is normally not very difficult, not knowing exactly what to expect can nerve-wrecking for even the most mechanically-inclined enthusiast. Thankfully, we’ve made a guide to help you through this process.
Seat Brackets Sold Separately
What You’ll Need:
BRAC-DLSL
BRAUM Racing Seat Bracket
Seat Brackets:
in addition to your aftermarket seats, you will seat brackets made specifically for your car. If you’re installing two seats make sure you have one driver’s side bracket and one passenger’s side bracket. They are usually not interchangeable!
Sliders (optional): unlike seat brackets, sliders are technically optional. If you don’t mind losing the ability to slide the seat forwards and backwards you can omit them. However, keep in mind that the position you install your seats in will be permanent, so make sure you’re at a comfortable distance from the pedals and steering wheel before tightening any bolts.
Side Mount Brackets (for side-mount seats only): for side mount seats you will need side-mount brackets. You can determine whether or not your seats are side mount by locating the mounting holes for the bracket. Are they on the sides of the seat, on the outsides of your thighs? If so, you have side mount seats. Are the holes on the bottom or underside of the seat? If so, you have bottom mount seats.
Installation Hardware: the necessary nuts and bolts you’ll need to install your seats probably came with your seats, but you should double-check. At minimum you’ll need 4 bolts for the seat bracket, 4 nuts and 4 bolts for the sliders (if applicable), and another 4 nuts and 4 bolts for the side mount brackets (if applicable).
Socket and Ratchet Set: obviously you won’t be able to install your seats without the proper tools. For the majority of cars all that you’ll need is a few sockets, an extension, and a ratchet. For Japanese cars, the size sockets you’ll need are 14mm and/or 17mm. Double check to make sure which ones you’ll need.
Flathead Screwdrivers: although not always necessary, an assortment of flathead screwdrivers can come in handy. You might need to pry some plastic covers off to access your seats’ bolts. Flathead screwdrivers do an adequate job of this and are common, making them ideal for this task.
If you have everything above handy, you’re ready to install your seats! The steps listed below cover the process for installing one aftermarket seat, but the process is the same for both sides. After you finish one side just repeat the same process for the other side.
1) Assemble Your New Seats (Bottom Mount):
The first thing you should do is attach your seat brackets and (if applicable) sliders to your new aftermarket seats.
- Attach sliders to seat (if applicable): start by setting your seat down, on its side, on a soft surface. Locate the holes at each corner of your sliders (if there is more than one hole per corner, just choose one; you can always adjust it later) and line them up with the four holes on the bottom of the seat. Insert bolts through these holes and tighten them. (If you’re not using sliders, skip this step).
- Attach seat bracket to sliders: for this step you might have to use the sliding mechanism on your slider to access the holes meant for the seat bracket. Once they’re lined up, slip 4 bolts through them and tighten them down with the corresponding nuts.
1) Assemble Your New Seats (Side Mount):
The first thing you should do is attach your seat brackets, side mounts, and (if applicable) sliders to your new aftermarket seats.
- Attach side mounts to sliders: line up the holes on each corner of the sliders to the holes on the front and back of the side mounts. Then slide bolts through them and tighten them down.
- Attach sliders to seat brackets: simply line up the four holes on the sliders with the four holes on the seat bracket and slip the bolts through them. Thread the corresponding nuts onto the bolts you just installed. (If you’re not using sliders, skip this step.)
- Attach seat to side mounts: slip your new seat in between the side mount brackets and line up the holes on each side of the seat with the holes on the side mount brackets. Then slip 4 bolts through the side mount brackets (2 on each side) and tighten them.
2) Remove the Factory Seat:
- Remove Rear Bolts: to remove the factory seat, first slide it all the way forward. Locate the two bolts on the back of the seat and use your socket set and ratchet to remove them.
- Remove Front Bolts: slide the seat all the way back now and locate the front two bolts. Use your socket set and ratchet to remove them.
- Unplug All Seat Connectors: tilt your seat back so that you can clearly see the underside of the seat. Locate any and all electrical connectors and disconnect them.
- Remove Seat from Car: at this point there should be nothing keeping you from physically removing the seat from your car. Gently maneuver the seat and attempt to pull it out, making sure to avoid scratching the car with the bracket or slider. If you feel any resistance, make sure you’ve unplugged everything connected to the seat.
- Remove the seat belt buckle (if applicable): if the seat belt buckle is attached to your factory seat, use your socket set and ratchet to remove the bolt holding it in place and remove it. If the buckle is attached to your vehicle’s chassis, you can ignore this step.
3) Install Your New Seat:
- Attach your factory seat belt buckle to your new seat bracket (if applicable): you may need a new bolt and a nut to install the buckle.
- Maneuver your new seat into your vehicle: again, be careful to avoid scratching your car with the seat bracket.
- Plug in electrical connectors: locate the electrical connectors that you unplugged from the factory seat, and connect them to your new seat. If your new seat can’t accommodate any of these connectors, leave them unplugged.
- Line up the seat bracket: locate the four holes from which you removed the four bolts holding the factory seat in place and line them up with the four holes at the corners of the seat bracket of your new seat.
- Bolt down the seat: install the original factory bolts in the reverse order of removal. If you’re using sliders, take advantage of them! Slide the seat back to install the front bolts, and then slide it forward to install the rears. Careful not to overtighten them!
- Check your seating position: make sure that you can position the seat in a way that’s comfortable for you. If it’s not possible, pull the seat out and try mounting the seat using different holes on the brackets and sliders.
4) Enjoy!
You’re finished! Sit back and appreciate your hard work!
Details
- BRR2-BKBK
- BRR2-BKBK
- Braum
- New
Categories
Shipping Information
- Item Requires Shipping
- Free Shipping!
- This item ships in its own box.
Customer Reviews
 Total Reviews (0)
You must login to post a review.
Questions and Answers

from this merchant give
them a 4 or 5-Star rating.


Write the First Review!